You can easily make your own cardboard VR headset with just a few materials. Start by gathering sturdy cardboard, biconvex lenses, some glue, and scissors. Cut and assemble the frame, ensuring you secure all edges. Next, install the lenses aligned with your eyes for a clear view. Don’t forget to create a holder for your smartphone and personalize your headset. If you follow these steps, you’ll be well on your way to an immersive VR experience. Learn how to enhance it further!
Materials You’ll Need
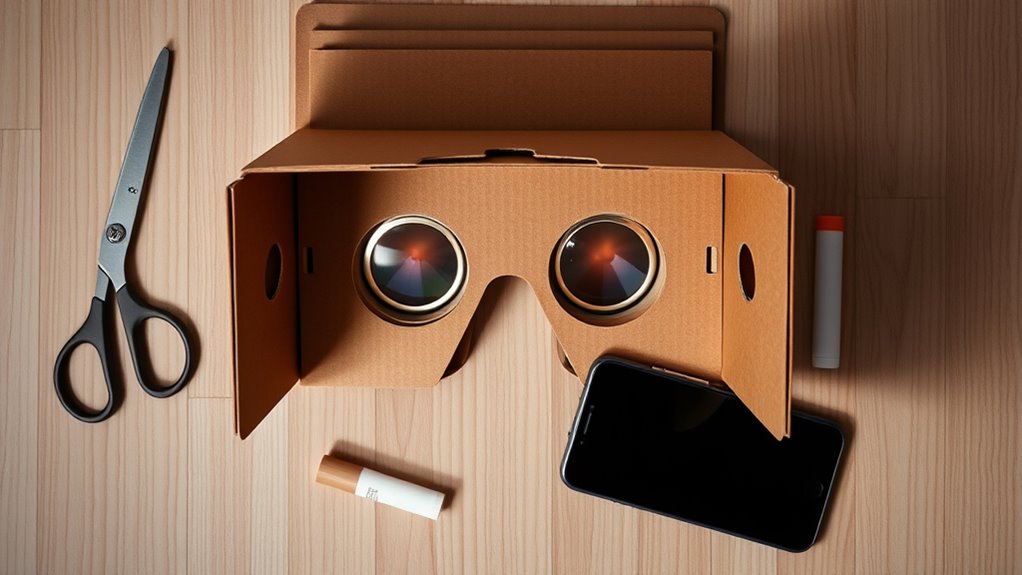
To create your DIY cardboard VR headset, you’ll need just a handful of materials. Start with a sturdy piece of cardboard—this’ll be your headset’s main structure. You’ll also need lenses; they’re essential for the immersive experience. Consider sourcing cost-effective options from old electronics or online suppliers. A craft knife or scissors will be your essential tools for cutting the cardboard, so keep those handy. You’ll also want some tape or glue to hold everything together securely. Don’t forget about a rubber band or velcro for added comfort while wearing your headset. With these materials, you’ll be well-equipped to build a functional and affordable VR headset that lets you explore new virtual worlds.
Step-by-Step Instructions
Now that you have your materials ready, it’s time to get started on assembling your cardboard VR headset. Follow these step-by-step instructions to guarantee a smooth building process. You’ll be enjoying your VR experience in no time!
Materials Needed
Gathering the right materials is essential for building your DIY cardboard VR headset. You’ll need sturdy cardboard types, like corrugated or thick poster board, to guarantee durability. Grab a pair of lens options; biconvex lenses work best for a clear view. You’ll also need a ruler, scissors, and a pencil for precise measurements and cuts. Don’t forget adhesive, like glue or tape, to hold everything together. For comfort, consider adding foam or soft padding around the eye area. Finally, a smartphone is required to complete your headset. By gathering these materials, you’ll be ready to create an immersive VR experience that offers you the freedom to explore virtual worlds.
Assembly Process
Begin by cutting out the main pieces of your cardboard template. Follow the lines carefully to guarantee a clean shape. Next, use assembly techniques like folding and scoring to create the headset’s structure. Make sure you fold at the marked lines for a snug fit.
Now, grab your glue or tape and start attaching the pieces together, focusing on securing the edges well. For assembly tips, consider using weights to hold the pieces in place while the adhesive sets.
Once everything’s assembled, test the fit of the lenses and adjust as needed. Finally, personalize your headset with paint or stickers, making it uniquely yours. Enjoy your freedom to explore virtual worlds with your newly crafted VR headset!
Assembling the Cardboard Frame
Assembling the cardboard frame is a straightforward yet essential step in creating your DIY VR headset. Begin by cutting out the pieces according to your design. Make sure each section aligns for maximum frame stability. If needed, you can make design adjustments to improve comfort and fit. Use strong adhesive to secure the pieces together, maintaining a robust structure.
Here’s a helpful table for reference:
| Step | Action | Tips |
|---|---|---|
| 1 | Cut cardboard pieces | Use a sharp utility knife |
| 2 | Assemble base | Make sure right angles |
| 3 | Attach side panels | Check for stability |
| 4 | Secure top section | Let glue dry completely |
| 5 | Final adjustments | Test for comfort |
Adding Lenses for a Clear View
Adding lenses is an essential step in ensuring you have a clear view while using your DIY VR headset. You’ll want to choose the right lens types; aspheric lenses are popular for their ability to reduce distortion. When selecting lenses, aim for a focal length that suits your smartphone’s display, typically between 35mm to 45mm.
Once you’ve got your lenses, proper lens placement is key. Secure them in the designated slots of your headset, ensuring they’re aligned with your eyes for peak viewing. A snug fit will help prevent light leaks and improve immersion. Test your headset after installation to make sure everything’s clear. With the right lenses in place, you’ll be ready to plunge into virtual experiences like never before!
Creating the Smartphone Holder
Creating a secure smartphone holder is essential for your DIY VR headset’s functionality. Start by measuring your smartphone to verify compatibility with the holder. Use cardboard to create a rectangular frame that snugly fits your device. Cut two side pieces and a bottom piece, then glue them together, confirming the dimensions allow your phone to slide in easily but remain secure.
To enhance holder stability, add small cardboard tabs on the sides to prevent your phone from sliding out during use. You can also incorporate velcro or elastic bands for extra security. Finally, test the fit with your smartphone to confirm it’s not too loose or tight. This’ll guarantee a smooth VR experience without interruptions.
Customizing Your VR Headset
While you might be excited to jump into using your VR headset, personalizing it can enhance both comfort and aesthetics. Start by choosing appealing color schemes that reflect your personality; bold colors can energize your experience, while softer tones might create a more relaxed vibe. Incorporate design elements like stickers or decals that resonate with your interests, making your headset feel uniquely yours. You can also consider adding padding or fabric to improve comfort during long sessions. If you’re feeling crafty, create custom faceplates or straps to further express your style. Remember, your VR headset isn’t just a tool—it’s a canvas for your creativity. So get imaginative and make it as vibrant and comfortable as you want!
Testing Your DIY VR Experience
Now that you’ve customized your VR headset, it’s time to test your creation. You’ll want to find the ideal viewing distance, explore various virtual reality apps, and adjust the lens settings for the best experience. Let’s get started on making your DIY VR adventure enjoyable and immersive!
Optimal Viewing Distance
Finding the ideal viewing distance for your DIY VR headset is crucial for an immersive experience. The best distance typically ranges from 5 to 8 inches from your eyes to the lenses. This range guarantees that the visuals are clear and reduces strain on your eyes, enhancing your viewing comfort. To determine your perfect distance, adjust the headset while testing various VR content. Pay attention to how the images appear—if they’re blurry or cause discomfort, you might need to tweak the distance. Remember, everyone’s preference can vary, so take the time to experiment. A well-calibrated headset not only improves immersion but also allows you to enjoy your VR adventures without distraction. Happy exploring!
Virtual Reality Apps
Testing your DIY VR headset with various virtual reality apps is an exciting way to gauge its performance and immersion capabilities. Start by exploring popular virtual reality gaming options available for your platform. Many apps offer a range of immersive experiences, from action-packed games to relaxing simulations. You’ll want to check the compatibility of your headset with these apps to guarantee peak performance. As you immerse yourself in different worlds, pay attention to how well your headset tracks movements and delivers visuals. Don’t be afraid to experiment with different apps to find what suits your preferences best. This exploration will not only enhance your understanding of your DIY headset but also allow you to fully enjoy the freedom that virtual reality offers.
Adjusting Lens Settings
After exploring various virtual reality apps, you’ll want to guarantee that your DIY headset delivers the best visual experience. Start with lens calibration; adjust the distance between the lenses to match your eyes for a comfortable view. Hold the headset up and look through the lenses while slowly moving them closer or further apart until the image is clear. Next, focus adjustment is key. Look for text or detailed images in your app—if they’re blurry, make small tweaks until everything sharpens up. Don’t hesitate to test different angles and positions; slight modifications can make a big difference. Once you’ve fine-tuned these settings, you’ll be ready to plunge into immersive worlds with your optimized VR headset!
Frequently Asked Questions
Can I Use Any Smartphone for the VR Headset?
You can’t use just any smartphone for a VR headset. Check your device’s compatibility with VR apps first. Most recent smartphones support various VR options, but older models might not deliver the best experience.
What Types of Lenses Work Best for VR Headsets?
For VR headsets, convex lenses work best, typically made from plastic or glass. Plastic lenses are lighter and more durable, while glass offers better optical clarity. Choose based on your comfort and intended use.
How Do I Ensure a Comfortable Fit for My Headset?
To guarantee a comfortable fit for your headset, think of it like a snug hug. Use soft padding materials and adjustable straps to secure it gently, allowing for extended wear without discomfort or pressure points.
Can I Use My VR Headset for Gaming?
Yes, you can use your VR headset for gaming! It enhances your virtual reality gaming experience by immersing you in vibrant worlds and interactive gameplay, making every session feel more engaging and enjoyable.
Is It Safe to Use a Cardboard Headset for Extended Periods?
Using a cardboard headset for extended periods can lead to eye strain; studies show 65% of users experience discomfort. To stay safe, take regular breaks and follow health precautions to minimize any potential risks.
