To clean your VR headset foam, first gather microfiber cloths and a mixture of distilled water and isopropyl alcohol. Power down the headset and carefully peel away the foam padding. Use a cloth dipped in your cleaning solution to wipe the foam, focusing on areas with sweat. Rinse and allow it to dry completely. Finally, wipe down the headset and securely reattach the foam. Stick with us to discover more cleaning tips and best practices.
Gather Your Cleaning Supplies
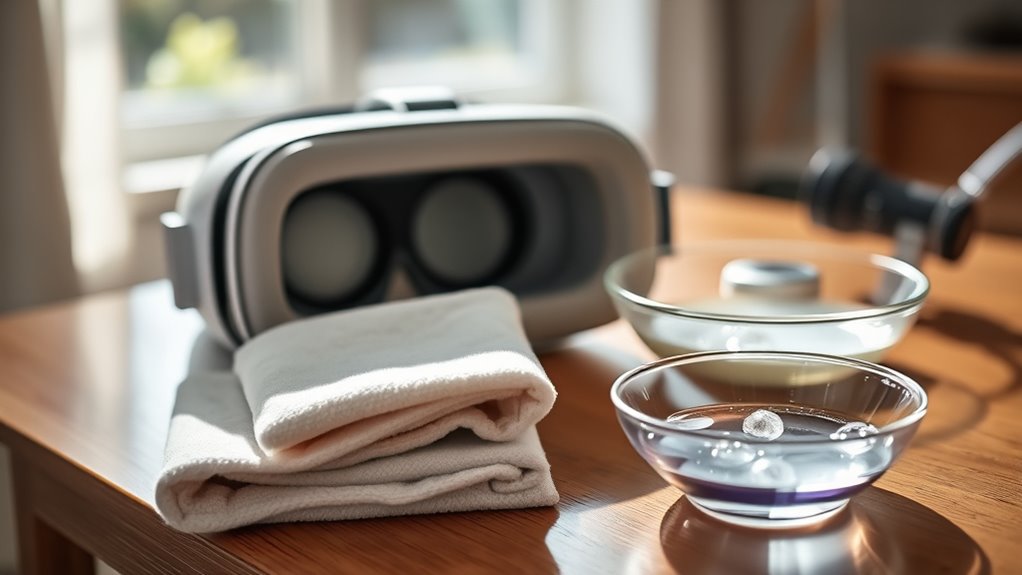
Before you plunge into cleaning your VR headset foam, it’s essential to gather the right supplies. Start with soft microfiber cloths, as they’re gentle on various foam types and won’t scratch surfaces. Next, choose appropriate cleaning materials; a mixture of distilled water and isopropyl alcohol works wonders. Avoid harsh chemicals that could damage the foam. If your headset has removable foam, check the manufacturer’s guidelines for specific cleaning recommendations. You might also want to grab cotton swabs for those hard-to-reach areas. Remember, using the right supplies not only guarantees a thorough clean but also prolongs the life of your headset. With everything ready, you’ll be prepared to tackle this task effectively and keep your VR experience fresh and comfortable.
Power Down Your VR Headset
Before you start cleaning your VR headset, it’s essential to power it down. This not only guarantees your safety but also protects the device from potential damage during the cleaning process. Always remember to unplug any cables as an added precaution.
Importance of Powering Down
Powering down your VR headset isn’t just a good habit; it’s crucial for maintaining the device’s longevity and performance. When you power down, you’re not only conserving battery life but also reducing wear on internal components. This simple action helps prevent overheating, which can lead to malfunctions or diminished image quality. Additionally, powering down enhances headset safety by minimizing the risk of accidental damage or unwanted updates while you’re not using it. Taking a moment to switch off your headset allows you to enjoy a seamless experience when you’re ready to dive back into your virtual world. Prioritize this practice to guarantee your VR headset remains in excellent condition for years to come.
Safety Precautions to Consider
While enjoying your VR experience, it’s essential to keep safety in mind, especially when it comes to powering down your headset. Before you start any cleaning methods for the foam materials, make certain to turn off the device. This not only prevents accidental activation but also protects your headset from potential damage during cleaning. Unplug the headset if it’s tethered, and remove any accessories like headphones or straps. Allow the foam to dry completely after cleaning to avoid mold or mildew growth. These precautions guarantee a safe and enjoyable VR experience, free from interruptions or mishaps. So, take a moment to power down properly; your headset—and your peace of mind—will thank you.
Remove the Foam Padding
To remove the foam padding from your VR headset, start by carefully peeling it away from the device. Depending on the foam types used in your headset, it might be attached with adhesive or simply fit snugly. Be gentle to avoid damaging any underlying components. If you encounter resistance, check for any clips or fasteners securing the padding materials. Avoid using excessive force, as this could lead to wear and tear on the device. Once the foam is free, inspect it for any signs of damage before cleaning or replacing it. Keeping your headset in good condition guarantees a better VR experience, so take your time during this process. Enjoy the freedom of a clean and fresh headset!
Prepare a Cleaning Solution
Before you plunge into cleaning your VR headset foam, it’s vital to prepare a proper cleaning solution. Start by choosing the right solution types; mild soap mixed with warm water or a dedicated electronic cleaner works well. Avoid harsh chemicals, as they can damage the foam or the headset’s materials. Use a clean microfiber cloth to apply the solution, making certain it’s damp, not soaking wet—excess moisture can seep into your device. This method is one of the best cleaning techniques to maintain hygiene without causing harm. Mix your solution in a bowl, and be sure to test it on a small area first to confirm compatibility. Your VR experience deserves to be clean and safe, so take these precautions seriously.
Clean the Foam Padding
Once you’ve prepared your cleaning solution, it’s time to tackle the foam padding of your VR headset. Start by gently removing the foam padding, if possible, to guarantee thorough cleaning. Use a soft cloth or sponge dipped in the solution to wipe down the surface. Focus on areas that have accumulated sweat or odors, as these can disrupt foam hygiene.
Here’s a quick reference table for cleaning:
| Task | Purpose |
|---|---|
| Wipe with solution | Odor elimination |
| Allow to air dry | Maintain foam hygiene |
| Inspect for damage | Guarantee longevity |
Regular cleaning enhances your VR experience and keeps the headset fresh. Remember, a clean headset means better gameplay!
Rinse and Dry the Foam
Rinse the foam padding thoroughly under lukewarm water to remove any remaining cleaning solution. Use a gentle rinse technique, ensuring that all soap is eliminated, as residue can irritate your skin during use. Next, carefully squeeze the foam to remove excess water without twisting or wringing it, which could damage the material. For drying methods, lay the foam flat on a clean, dry towel in a well-ventilated area. Avoid direct sunlight or heat sources, as they can warp or degrade the foam. Allow it to air dry completely before reattaching it to your headset. This process not only keeps your VR setup fresh but also extends the life of your foam padding. Enjoy your clean, comfortable experience!
Wipe Down the Headset
Before you start wiping down your VR headset, gather all the necessary cleaning supplies, like microfiber cloths and gentle cleaners. It’s important to avoid harsh chemicals that could damage the device. Once you’ve cleaned it, make sure to dry it properly to prevent any moisture buildup.
Gather Cleaning Supplies
While you might be enthusiastic to get started, gathering the right cleaning supplies is essential for effectively wiping down your VR headset. Using the appropriate materials guarantees you don’t damage the foam materials or the headset itself. Here’s a quick list of items you’ll need:
- Microfiber cloth: Soft and non-abrasive for gentle cleaning.
- Isopropyl alcohol: Effective for disinfecting without harming electronics.
- Distilled water: Helps dilute solutions without leaving minerals behind.
- Cotton swabs: Perfect for reaching tight spots and crevices.
Make sure to avoid harsh chemicals or abrasive materials, as they can ruin the headset and foam. With the right cleaning supplies in hand, you’ll be ready to keep your VR experience fresh and enjoyable.
Use Gentle Cleaners
Now that you’ve gathered your cleaning supplies, it’s time to wipe down the headset. Use gentle surface cleaners or foam sanitizing sprays to avoid damaging the materials. Never apply cleaners directly to the headset; instead, spray them onto a soft cloth.
| Cleaner Type | Usage Instructions |
|---|---|
| Gentle Surface Cleaner | Lightly dampen cloth, wipe surfaces |
| Foam Sanitizing Spray | Spray on cloth, clean foam padding |
| Isopropyl Alcohol | Dilute before use, avoid plastic parts |
| Water and Vinegar | Mix 1:1, use sparingly |
| Microfiber Cloth | Ideal for all surfaces |
Dry Properly Afterward
After cleaning your VR headset, it is crucial to dry it properly to prevent moisture damage. Use effective drying techniques to guarantee your foam materials and headset remain in good condition. Here are some tips to help you dry your headset:
- Gently wipe down the exterior with a microfiber cloth.
- Allow the foam materials to air dry completely before reassembling.
- Avoid using heat sources like hairdryers, as they can warp the foam.
- Store the headset in a cool, dry place to prevent future moisture buildup.
Reattach the Foam Padding
Once you’ve cleaned the foam padding, it’s essential to reattach it carefully to guarantee a comfortable fit during your VR sessions. Start by ensuring the adhesive surfaces are free of dust or debris. Use reliable foam attachment techniques that align the padding correctly with the headset’s contours. Press firmly but gently, ensuring a secure bond without damaging the foam. If you’re considering foam replacement options, make sure the new padding matches your headset model for maximum comfort and functionality. Avoid using excessive force, as this can compromise the integrity of the foam. By following these steps, you’ll enhance your VR experience while keeping your equipment in top shape. Enjoy your immersive adventures without discomfort!
Maintain Regular Cleaning Schedule
Regularly maintaining a cleaning schedule for your VR headset foam is essential for hygiene and comfort. Establishing a cleaning frequency guarantees your headset stays fresh and free of bacteria. Here’s how to make foam maintenance a breeze:
- Clean after every use: Wipe down foam with a disinfectant cloth to remove sweat and oils.
- Deep clean weekly: Remove the foam and wash it according to manufacturer instructions.
- Inspect regularly: Check for wear and tear; replace foam if necessary.
- Store properly: Keep your headset in a cool, dry place to prevent buildup.
Frequently Asked Questions
How Often Should I Clean My VR Headset Foam?
You should clean your VR headset foam at least once a week for ideal foam maintenance. Regular cleaning frequency prevents buildup, ensuring comfort and hygiene, so you can enjoy your immersive experiences without worry.
Can I Use Alcohol to Clean the Foam Padding?
You shouldn’t use alcohol to clean the foam padding; its high alcohol concentration can damage materials. Instead, opt for gentler cleaning techniques that preserve the integrity and comfort of your VR headset’s foam. Stay safe!
What if My Headset Foam Is Damaged or Worn?
If your headset foam’s damaged or worn, consider foam replacement options. Regularly check for wear and follow headset maintenance tips to guarantee comfort and longevity, keeping your VR experience enjoyable and immersive for longer.
Are There Specific Cleaning Products to Avoid?
Avoid harsh cleaning materials like bleach or alcohol, as they can damage foam types in your headset. Stick to gentle cleaners specifically designed for electronics to keep your VR foam in great condition and extend its lifespan.
Is It Safe to Clean the Lenses of My VR Headset?
Yes, it’s safe to clean your VR headset lenses, but use safe solutions like microfiber cloths and lens cleaners. Avoid harsh chemicals, ensuring you preserve clarity and prevent damage. Always handle with care for peak performance.
