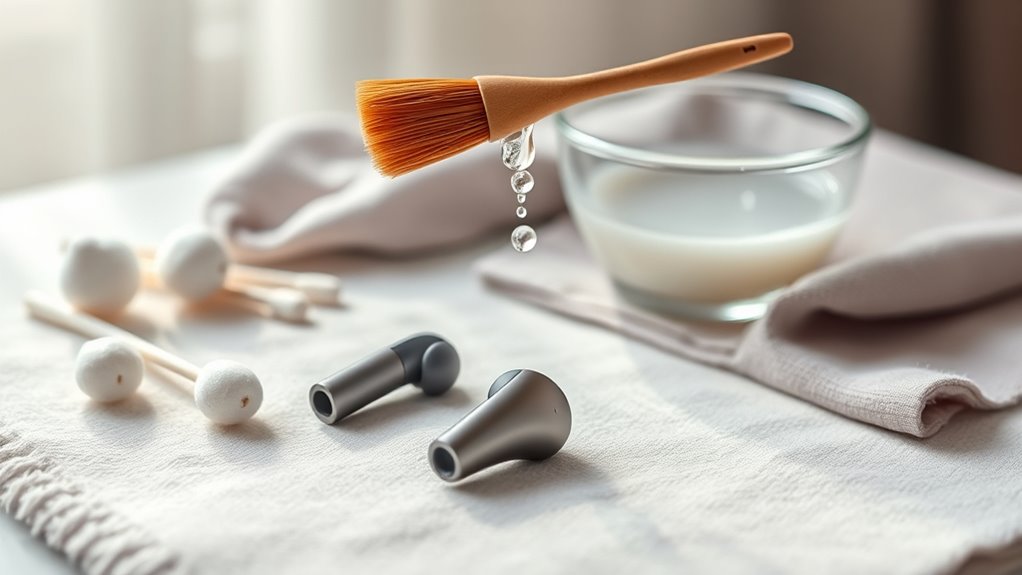
To clean your earbuds, start by detaching the ear tips and wiping them with a soft, lint-free cloth. Use cotton swabs to clean the earbud mesh gently, avoiding moisture inside. Sanitize ear tips with disinfectant, and for thorough disinfection, use isopropyl alcohol. Make sure your earbuds dry completely before reassembling. Regular cleaning not only maintains sound quality but also promotes hygiene. If you’re curious about storage tips and maintenance, there’s more to explore!
Why Cleaning Your Earbuds Is Important
Cleaning your earbuds is essential not just for hygiene but also for maintaining sound quality. Over time, dirt, sweat, and earwax accumulate, which can negatively affect your listening experience. When you neglect ear health, you risk ear infections and other issues that could hinder your ability to enjoy music or podcasts. Grime can muffle sound, making it hard to appreciate the clarity and richness of your favorite tracks. Regular cleaning helps preserve the integrity of your earbuds, ensuring they perform at their best. Plus, it contributes to a more enjoyable and comfortable listening experience. By prioritizing ear health and sound quality, you’re investing in your freedom to enjoy audio without interruption or discomfort. So, make cleaning a habit!
Gather Your Cleaning Supplies
Before you start cleaning your earbuds, you’ll need to gather some essential supplies. Make certain you have safe cleaning solutions and tools on hand to avoid any damage. Preparing everything in advance will streamline the cleaning process and guarantee effective results.
Essential Cleaning Tools
To effectively clean your earbuds, you’ll need a few essential tools that make the process easier and more efficient. Start with a soft, lint-free cloth for wiping down surfaces and removing dirt. Cotton swabs are great for getting into those tiny crevices, while a soft-bristled brush can help dislodge stubborn debris. Having a small bowl of warm, soapy water can assist with deeper cleaning, but remember to avoid soaking your earbuds. Regular maintenance habits, like cleaning frequency, will keep your earbuds in top condition and prolong their lifespan. Finally, a toothpick or a similar tool can help remove stubborn buildup, ensuring your earbuds stay functional and comfortable to use.
Safe Cleaning Solutions
While you gather your cleaning supplies, it’s important to choose safe solutions that won’t damage your earbuds. Opt for natural cleaners or alcohol wipes, as these are effective yet gentle on the materials. Here’s a quick guide to help you pick the right cleaning solution:
| Cleaning Solution | Pros | Cons |
|---|---|---|
| Natural Cleaners | Eco-friendly, non-toxic | May require more effort |
| Alcohol Wipes | Quick and convenient | Can be harsh if used excessively |
Using these options guarantees your earbuds stay clean without compromising their lifespan. Remember, a little care goes a long way in maintaining your audio freedom, so choose wisely as you prep for the cleaning process!
Preparation Steps Needed
Gathering your cleaning supplies is essential for an effective cleaning session, so make sure you have everything you need within reach. Start with a microfiber cloth, which is perfect for wiping down surfaces without scratching your earbuds. You’ll also want some cotton swabs for those pesky crevices. A gentle cleaning solution, like isopropyl alcohol or soapy water, can help tackle grime. It’s wise to have a small bowl for mixing solutions, too. Don’t forget to check your cleaning frequency; regular earbud maintenance can prevent build-up and prolong their life. Once you’ve gathered these supplies, you’ll be ready to give your earbuds the care they deserve, ensuring a better listening experience every time.
Remove Ear Tips and Grime
To keep your earbuds clean, start by safely detaching the ear tips. Once they’re off, use a soft cloth to wipe away any grime. Finally, sanitize the tips with a disinfectant to guarantee they’re germ-free.
Detach Ear Tips Safely
Before diving into the cleaning process, it’s crucial to detach the ear tips safely to avoid damaging your earbuds. Different ear tip materials and styles can require varied approaches.
Here’s a quick guide to help you through the process:
| Ear Tip Style | Material Type | Detachment Method |
|---|---|---|
| Foam | Soft Foam | Gently twist and pull off |
| Silicone | Flexible Silicone | Grip and pull straight out |
| Rubber | Durable Rubber | Firmly tug to remove |
Always check for any grime or buildup around the connection point as you remove the tips. This guarantees that you’re ready for the next step in your cleaning routine. Keep your earbuds in top shape for a better listening experience!
Wipe Grime Away
Now that you’ve safely detached the ear tips, it’s time to tackle the grime that can accumulate on your earbuds. To maintain good earbud hygiene, grab a microfiber cloth or a soft, lint-free cloth. Dampen it slightly with water or a mild soap solution—just enough to lift dirt without soaking the electronics. Gently wipe down the earbud surfaces, focusing on any crevices where grime hides. For stubborn spots, a cotton swab can help reach those tight areas. Aim to clean your earbuds at least once a week to keep them in top shape. Maintaining a regular cleaning frequency not only enhances sound quality but also keeps your ears healthy and free from irritations.
Sanitize With Disinfectant
Once you’ve removed the ear tips and wiped away any grime, it’s vital to sanitize your earbuds to eliminate germs and bacteria. Start by choosing disinfectant options like isopropyl alcohol (70% or higher) or disinfecting wipes that are safe for electronics. Dampen a microfiber cloth or cotton swab with the disinfectant—don’t soak it. Gently wipe down the surfaces of your earbuds, paying special attention to the mesh areas where grime can lurk. For the ear tips, clean them with the same solution or a mild soap and water mixture, then let them dry completely before reattaching. Using these application techniques guarantees your earbuds stay hygienic and ready for use, allowing you to enjoy your music worry-free.
Clean the Earbud Mesh
Although it might seem minor, cleaning the earbud mesh is crucial for maintaining sound quality and hygiene. Over time, dirt, wax, and debris can accumulate in the mesh, affecting both audio performance and your earbud hygiene. To clean the mesh, start by gently removing any visible debris using a soft, dry brush or a microfiber cloth. Be careful not to push anything further into the mesh. For deeper cleaning, lightly dampen the cloth with water or a mild soap solution, but avoid getting moisture inside the earbuds. Regular mesh maintenance not only enhances your listening experience but also keeps your earbuds in good shape. Making this a routine part of your cleaning will guarantee both longevity and cleanliness.
Disinfect the Earbuds
Disinfecting your earbuds is essential for eliminating germs and bacteria that can build up from regular use. To keep your earbuds safe and clean, consider using effective disinfecting methods like alcohol wipes or a diluted solution of isopropyl alcohol. Make sure to avoid getting moisture into the speaker mesh. Depending on how often you use them, aim for a cleaning frequency of at least once a week. If you’re a frequent traveler or use them during workouts, you might want to disinfect more often. Remember, cleanliness not only enhances your listening experience but also protects your health. By staying on top of this simple task, you can enjoy your music without worrying about unwanted germs.
Wipe Down the Charging Case
After taking care of your earbuds, don’t forget about their charging case. Regular charging case maintenance is essential for keeping your earbuds in top shape. Use a soft, lint-free cloth to gently wipe down the exterior, removing dust, fingerprints, and any grime that’s accumulated. For tougher spots, slightly dampen the cloth with a mixture of water and isopropyl alcohol, but avoid getting moisture inside the case. It’s best to clean your charging case every couple of weeks, or more often if you frequently use your earbuds. This way, you maintain a clean environment for charging, ensuring your earbuds perform their best. Remember, a clean case contributes to a longer lifespan for your audio gear!
Drying Your Earbuds Properly
Once you’ve cleaned your earbuds, it’s essential to dry them properly to avoid moisture damage. You can use air drying techniques to guarantee they’re completely dry before storing them. Follow these recommendations to keep your earbuds in top shape and prolong their lifespan.
Air Drying Techniques
To guarantee your earbuds remain in top condition, it’s essential to dry them properly after cleaning. Air drying is an effective method, and using proper techniques can enhance the longevity of your earbuds. Start by gently shaking off any excess moisture. Then, place them in a well-ventilated area away from direct sunlight or heat sources, as extreme temperatures can damage the components. It’s best to let them sit for at least 30 minutes, or longer if they’re particularly wet. If you want to speed up the process, you can use a soft, lint-free cloth to absorb moisture around the edges and speaker openings. Remember, patience is key; rushing the drying process can lead to unwanted moisture damage.
Avoiding Moisture Damage
While it might seem tempting to use a quick fix for drying your earbuds, proper techniques are essential to avoid moisture damage. First, gently wipe off any excess moisture with a soft, lint-free cloth. Next, let your earbuds air dry in a well-ventilated area, away from direct sunlight or heat sources. This moisture prevention method helps guarantee that no water lingers in sensitive components. If you’re in a hurry, you can use a fan to speed up the drying process, but avoid using a hairdryer, as the heat can cause damage. Remember, investing time in damage control now can save you from costly replacements later. Keep your earbuds dry, and they’ll serve you well for longer!
Storage Recommendations
When it comes to storing your earbuds, choosing the right environment can greatly enhance their longevity. After cleaning, let them air dry completely before putting them away. You don’t want moisture lingering, as it can lead to damage. Consider using storage solutions like a padded case or a dedicated drawer to keep them safe. These organizing techniques help prevent tangling and protect your earbuds from impacts. If you’re on the go, a small travel pouch can be a great option. Always store them in a cool, dry place, away from direct sunlight or heat sources. By following these tips, you’ll guarantee your earbuds stay in great shape, ready for your next listening adventure.
Reassemble and Test Sound Quality
After cleaning your earbuds, it’s time to reassemble them and test their sound quality. Start by putting the ear tips back on, ensuring they’re secure. Once reassembled, grab your device and play a variety of tracks—this will help with the sound test. Focus on different genres to assess bass, mids, and highs.
Listen for any distortion or interruptions, which could indicate that further cleaning is needed or that something’s off with the components. If all sounds clear, congratulations! You’ve successfully completed a quality check.
Also, make sure to check the balance in both earbuds. A well-functioning pair should deliver an even sound experience. Enjoy your refreshed audio freedom!
Tips for Maintaining Clean Earbuds
To keep your earbuds in top shape, it’s important to establish a regular cleaning routine. Start by gently wiping the ear tips with a damp cloth to remove dirt and oils, enhancing earbud hygiene. Use a soft brush to clear out any debris from the speaker grilles, ensuring peak sound quality. After each use, store your earbuds in a case to protect them from dust and moisture. Avoid sharing them to reduce the risk of bacteria buildup. If you notice a decline in sound quality, it might be time to check for blockages. By maintaining this routine, you’ll not only extend the life of your earbuds but also enjoy a superior listening experience.
When to Replace Your Earbuds
Even with a solid cleaning routine, there comes a time when earbuds need to be replaced. The typical earbud lifespan is around one to two years, but various factors can affect this. Pay attention to signs of replacement: if you notice muffled sound quality, persistent static, or a decline in battery life, it’s probably time to say goodbye. Additionally, if the ear tips are worn out or if there’s visible damage to the wiring, replacement is essential for your listening experience. Don’t hold onto earbuds that no longer meet your standards; investing in a new pair can enhance your freedom to enjoy music and podcasts without interruptions. Keep your ears happy and your sound crisp!
Frequently Asked Questions
Can I Use Alcohol Wipes to Clean My Earbuds?
Yes, you can use alcohol wipes to clean your earbuds. Their alcohol effectiveness helps eliminate germs. Just make sure you clean them regularly to maintain hygiene and prolong their lifespan. Don’t overdo it, though!
How Often Should I Clean My Earbuds?
Clean your earbuds regularly; after all, “a stitch in time saves nine.” For ideal earbud maintenance, aim for cleaning at least once a week, adjusting frequency based on usage and earwax buildup.
Are There Specific Cleaning Solutions Recommended?
You can use mild soap and water, or alcohol wipes for cleaning. Avoid harsh chemicals. For safe cleaning materials, microfiber cloths and soft brushes are recommended cleaning methods to prevent damage while keeping your earbuds fresh.
Is It Safe to Submerge Earbuds in Water?
No, it’s not safe to submerge your earbuds in water. Doing so can cause water damage, compromising their functionality. For proper earbud maintenance, stick to dry cleaning methods to keep them in great shape.
Can I Use Cotton Swabs to Clean the Mesh?
Yes, you can use cotton swabs for earbud maintenance, but be gentle. Cleaning techniques include lightly dabbing the mesh to remove debris without pushing dirt further in. Always prioritize care to maintain your earbuds’ quality.
