To hook your Super Nintendo to a smart TV, start by gathering the necessary cables, like an AV cable or HDMI adapter for compatibility. Identify the available input options on your TV, such as HDMI or composite. Connect the console to the TV, plug in the power, and insert a game cartridge. Make sure the TV input matches the console connection. If you run into issues, troubleshooting steps can help. Find out more tips and tricks for an ideal setup.
Understanding the Necessary Cables
To successfully hook up your Super Nintendo to a smart TV, you’ll need a few specific cables. First, consider the cable types: the original Super Nintendo uses an AV cable with composite connections (yellow for video, red and white for audio). If you want better quality, you might look for an S-Video cable, if your TV supports that connection method. You can also find adapters that convert the console’s output to HDMI, which is more common in modern TVs. Whichever method you choose, make certain your cables are in good condition to avoid any connectivity issues. Setting up these connections correctly will guarantee a smooth gaming experience, letting you enjoy your favorite retro games on a modern screen.
Identifying Your TV’s Input Options
Before connecting your Super Nintendo, it’s important to identify the input options available on your smart TV. Most TVs offer HDMI, composite, or component inputs, so check which ones your TV supports. Knowing these options will help you choose the right cables for a seamless connection.
Types of TV Inputs
While setting up your Super Nintendo, it’s important to identify the types of inputs available on your smart TV. Most modern TVs primarily use HDMI inputs, adhering to HDMI standards for high-quality audio and video. If your TV has multiple HDMI ports, you’re in luck, as this will simplify your connection. However, some TVs still feature older AV technology like composite or component inputs, which may require adapters for compatibility. Check your smart TV’s manual or settings menu for input options. Knowing these inputs will help you determine the best way to connect your Super Nintendo, ensuring you can enjoy those classic games on a larger screen without hassle.
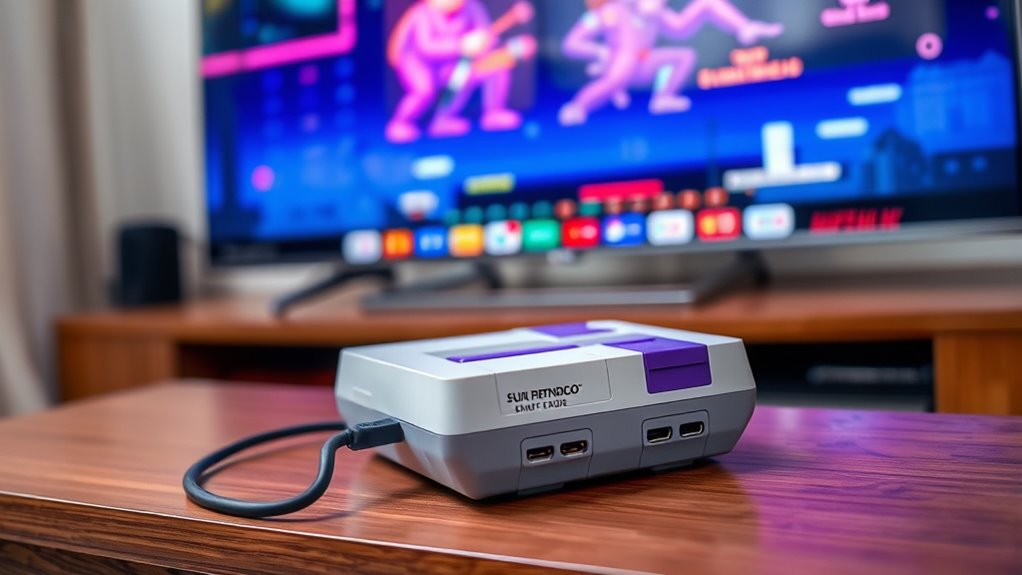
Cable Connection Options
When connecting your Super Nintendo to a smart TV, understanding the available cable connection options is essential. Knowing the right cable types and connection methods can make your gaming experience smoother. Here are some common options you might consider:
- Composite Cable: The classic yellow, red, and white connectors are easy to use but may not offer the best picture quality.
- S-Video Cable: A step up from composite, providing better video quality if your TV supports it.
- HDMI Adapter: This allows you to connect your SNES to modern TVs using an HDMI port, enhancing compatibility.
- Component Cable: If your TV has component inputs, this can deliver excellent video quality.
Pick the connection that suits your setup best and get ready to relive those classic gaming moments!
Setting Up the Super Nintendo Console
Setting up your Super Nintendo console is a straightforward process that can have you gaming in no time. First, find a suitable spot for your console where it can breathe and you can easily access the controls. Make sure to connect the power supply to the console and plug it into an outlet. Next, pop in your favorite game cartridge – this is where the gaming nostalgia kicks in, reminding you of classic adventures. Familiarize yourself with the console features, like the controller ports, reset button, and power switch, ensuring everything’s in working order. Once everything’s set, you’ll be ready to relive those cherished gaming moments. Enjoy the freedom of retro gaming right from your own living room!
Connecting the Cables to the TV
With your Super Nintendo set up and ready to go, the next step is connecting the necessary cables to your smart TV. Depending on your TV’s available inputs, you’ll want to choose the right cable types and connection methods. Here’s how to connect:
- AV Cables: Use the yellow, red, and white connectors for standard video and audio output.
- S-Video Cable: If your TV supports it, this offers better picture quality than standard AV cables.
- HDMI Adapter: An HDMI adapter can convert the signal for modern TVs, enhancing your experience.
- Component Cables: If you’ve got a compatible setup, these can provide even clearer visuals.
Make sure everything’s securely connected, and you’re on your way to gaming bliss!
Adjusting the TV Settings for Compatibility
Before diving into your gaming session, it’s essential to adjust your TV settings for ideal compatibility with the Super Nintendo. Start by accessing your TV’s settings menu, where you can make vital adjustments, such as changing resolution and adjusting brightness. Here’s a quick reference table to help you with the settings:
| Setting | Recommended Value | Description |
|---|---|---|
| Resolution | 480p | Best for classic gaming clarity |
| Brightness | 50% | Balances dark and light scenes |
| Contrast | 70% | Enhances details in the image |
| Aspect Ratio | 4:3 | Maintains the original game view |
With these adjustments, you’ll create a smoother and more enjoyable gaming experience on your Smart TV.
Troubleshooting Common Connection Issues
Even after optimizing your TV settings, you might still encounter connection issues when hooking up your Super Nintendo. Don’t worry! Here are some troubleshooting tips to help you out with those pesky connection problems:
Even after adjusting your TV settings, connection issues with your Super Nintendo can arise—don’t panic, troubleshooting solutions are here!
- Check your cables: Make sure all cables are securely connected and undamaged.
- Verify inputs: Double-check that your TV’s input source matches where the console is plugged in.
- Adjust resolution settings: Your TV’s resolution might not be compatible, so try lowering it temporarily.
- Restart devices: Sometimes, a simple reboot of both your TV and Super Nintendo can resolve any lingering issues.
With these tips, you’ll be back to gaming in no time!
Enhancing Your Gaming Experience With Accessories
Elevating your gaming experience can transform nostalgia into a vibrant adventure. To truly immerse yourself in the magic of the Super Nintendo, consider investing in quality gaming accessories. Enhanced audio systems can bring those classic soundtracks to life, while HDMI adapters guarantee crisp visuals. Retro controllers are another must-have; they not only provide that authentic feel but also often come with added features like turbo buttons for faster gameplay. You can also explore custom skins or grips for added comfort during those marathon gaming sessions. With the right accessories, you’ll access the full potential of your beloved console, making every moment on your Smart TV a journey back to the golden age of gaming. Enjoy your adventure!
Enjoying Classic Games on Your Smart TV
To enjoy classic games on your Smart TV, you’ll need the right cables and adapters to connect your Super Nintendo. Setting up the connections is straightforward, ensuring you can relive those nostalgic gaming moments. Let’s explore what you’ll need to get started.
Required Cables and Adapters
Since you want to enjoy classic Super Nintendo games on your smart TV, having the right cables and adapters is essential. Here’s a quick list of what you’ll need:
- RCA Cables: These are the classic cable types for connecting your SNES to your TV’s composite input.
- HDMI Adapter: If your smart TV lacks RCA ports, an HDMI adapter option can convert the signal.
- S-Video Cable: For better video quality, consider using an S-Video cable with the appropriate adapter to connect to your TV.
- Power Adapter: Don’t forget a compatible power adapter for your SNES to keep it running smoothly.
With these cables and adapters, you’re ready to plunge into nostalgia and enjoy your gaming experience!
Setting Up Connections
Setting up your Super Nintendo to connect with your smart TV can be done in just a few simple steps. First, plug one end of your AV cable into the Super Nintendo and the other into the corresponding ports on your TV. Make certain to select the correct input source on your TV to display the console’s signal. For better signal quality, consider using an AV to HDMI adapter if needed. Next, focus on cable management—keeping your cables organized will help avoid tangles and guarantee a clean setup. Finally, secure everything in place, and you’re ready to enjoy classic games on your smart TV. With these steps, you’ll be gaming like it’s the ’90s again!
Frequently Asked Questions
Can I Use Wireless Controllers With My Super Nintendo?
Yes, you can use wireless controller options with your Super Nintendo. There are various retro gaming accessories available that allow for a wireless experience, enhancing your gameplay while maintaining that nostalgic feel you love.
Will My Smart TV Support 4:3 Aspect Ratio?
Your smart TV might support a 4:3 aspect ratio, but it depends on its screen settings. Check the display options in your TV’s menu to adjust and enjoy classic games without distortion.
Are There Any Game Compatibility Issues With Smart TVS?
You might experience input lag when playing retro games on a smart TV, making classic titles like Super Mario World feel sluggish. Game resolution can also affect visuals, diminishing the nostalgia and joy of your gaming experience.
Can I Connect Multiple Consoles to the Same TV?
Yes, you can connect multiple consoles to the same TV. Use HDMI switches or composite adapters for easy console switching methods, allowing you to enjoy various gaming experiences without constantly unplugging and replugging cables.
Is There a Way to Upscale Graphics on My Smart TV?
Yes, there are upscaling options to improve your gaming experience. You can explore graphic enhancements through your TV settings, using features like 4K upscaling or image processing to make your games look sharper and more vibrant.
