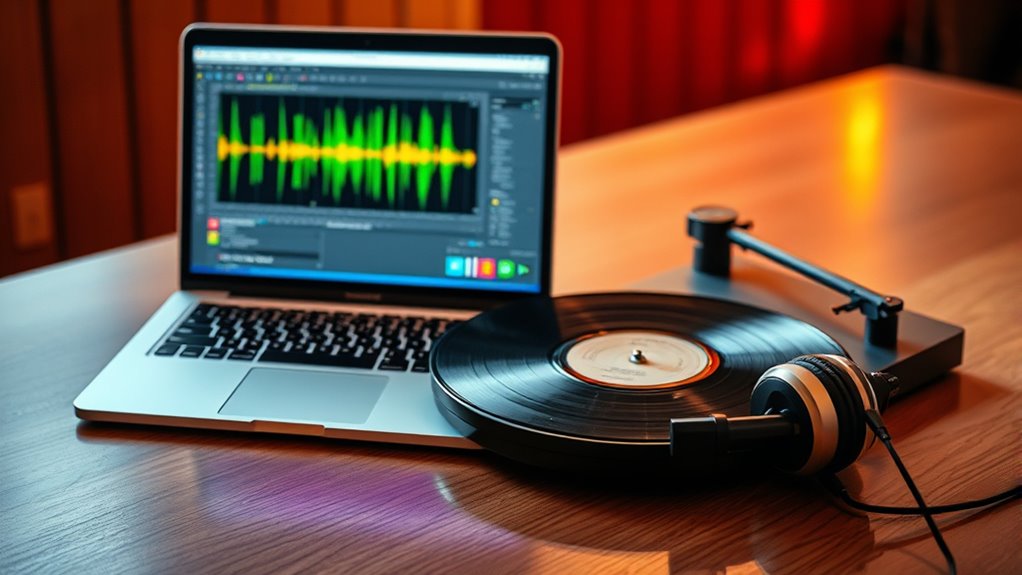
To monitor LP recording on Audacity, first verify your turntable is properly connected to your computer via an audio interface or USB. Configure Audacity by setting the sample rate to 48 kHz and bit depth to 24-bit for best quality. While recording, keep a close eye on audio levels, aiming for peaks around -12 dB to -6 dB to avoid clipping. Using headphones will help with sound isolation. There’s more to take into account for a seamless recording process.
Required Equipment for LP Recording
To successfully record LPs using Audacity, you’ll need specific equipment to guarantee high-quality audio capture. Start with a reliable turntable that supports various LP formats, ensuring it has a good cartridge and stylus for superior sound quality. You’ll also require an audio interface or USB phono preamp to connect your turntable to your computer, as this helps convert the analog signal into a digital format without losing fidelity. High-quality cables are essential too; use shielded RCA or USB cables to minimize interference. Finally, headphones or studio monitors will allow you to monitor the sound accurately during recording. Investing in quality gear will enhance your recording experience and preserve the nuances of your vinyl collection.
Setting Up Your Vinyl Turntable
To set up your vinyl turntable effectively, you need to choose a model that suits your recording needs and budget. Once you’ve selected the right turntable, connecting it to your computer requires the appropriate cables and interfaces to guarantee peak sound quality. Proper setup is essential for achieving the best monitoring results during your LP recording process.
Choosing the Right Turntable
Choosing the right turntable is essential for achieving ideal sound quality when monitoring LP recordings in Audacity. You’ll encounter various turntable types, including belt-driven, direct-drive, and automatic models. Each has distinct advantages—belt-driven turntables reduce motor noise, while direct-drive versions allow for quick starts and stops, beneficial for DJs. If you’re on a budget, consider entry-level options that still provide decent audio quality without breaking the bank. Look for models with adjustable tracking force and anti-skate features to enhance playback fidelity. Ultimately, your choice should align with your specific needs and sound preferences, ensuring you capture the essence of the vinyl for a top-notch recording experience.
Connecting to Computer
Once you’ve selected the right turntable, the next step is connecting it to your computer for recording. This connection is essential for capturing high-quality audio. Here’s how you can set it up:
- Choose the right audio interface: Select an interface that supports your turntable’s output and has the necessary inputs.
- Connect the turntable: Use RCA cables to connect your turntable to the audio interface’s input.
- Install recording software: Download and install Audacity or your preferred recording software on your computer.
- Configure settings: Open the software, select the audio interface as the input source, and adjust the levels for ideal recording.
Now you’re ready to monitor your LP recordings effectively!
Connecting to Your Computer
Connecting your turntable to a computer requires specific cables and an audio interface to guarantee a seamless recording process. Start by checking your turntable setup; you need either RCA cables or a USB connection, depending on your model. The audio interface acts as the bridge, converting analog signals to digital for your computer to process.
Here’s a quick overview of the necessary components:
| Component | Description | Purpose |
|---|---|---|
| Turntable | Vinyl playback device | Source of audio |
| Audio Interface | Digital converter | Connects turntable to computer |
| Cables | RCA or USB | Transfers audio signals |
Once connected, you’re ready to plunge into recording!
Configuring Audacity Settings
- Sample Rate: Set it to 48 kHz for better audio quality.
- Bit Depth: Choose 24-bit to capture more dynamic range.
- Input Device: Select your audio interface or USB turntable to guarantee proper signal capture.
- Playback Volume: Adjust to a comfortable level to monitor without distortion.
Monitoring and Adjusting Audio Levels
As you begin the monitoring process in Audacity, it’s important to keep a close eye on audio levels to guarantee that your recording remains clear and free from distortion. Use the meters in the interface for real-time monitoring, ensuring that levels stay within the ideal range, typically peaking around -12 dB to -6 dB. If the audio levels approach 0 dB, you’re likely to encounter clipping, which can degrade sound quality. Adjust your input gain accordingly, whether via your audio interface or within Audacity’s settings. Don’t forget to use headphones for accurate monitoring; this helps isolate the sound and reduces feedback. Regularly check your levels to maintain a balanced mix throughout the recording process.
Exporting Your Recorded Files
Once you’ve finished recording your LP in Audacity, the next essential step is exporting your files to guarantee they’re saved in a usable format. Choosing the right export formats can enhance your audio’s quality and accessibility. Here’s how to do it effectively:
- Select Export: Click on “File” and then “Export” to choose your desired format.
- Choose Format: Opt for formats like WAV for high quality or MP3 for efficient file compression.
- Set Metadata: Fill in the necessary metadata to help organize your tracks.
- Save Location: Designate where to save your files, ensuring they’re easy to find later.
Frequently Asked Questions
Can I Use a USB Turntable for Recording LPS?
Absolutely, you can use a USB turntable for recording LPs. Its advantages include easy digital transfer and compact design. Just consider recording quality, as some models may compromise sound fidelity compared to traditional setups.
How Do I Clean My Vinyl Records Before Recording?
To clean your vinyl records before recording, use a dedicated vinyl cleaning solution and microfiber cloth. Regular record maintenance, including proper cleaning, guarantees ideal sound quality and extends the lifespan of your cherished records.
What Is the Best File Format for Exporting Audio?
For the best audio quality, export in WAV or FLAC formats; they’re lossless. If you need file compression, consider MP3, but be aware it may reduce sound fidelity. Choose based on your project’s requirements.
Is There a Way to Remove Clicks and Pops From Recordings?
You can remove clicks and pops from recordings using click removal tools in audio restoration software. These features analyze waveforms, identifying unwanted sounds, and help you achieve cleaner audio, giving your recordings that polished edge.
Can I Record Multiple LPS in One Session?
Yes, you can record multiple LPs in one session. Utilize efficient recording techniques, ensuring proper setup and monitoring to capture high-quality audio, while minimizing interruptions and optimizing your workflow for seamless multi LP sessions.
