Before the modern tech-savvy age took over, Onkyo actually made genuinely good, robust products, but over the years, the build quality of Onkyo has been quite the letdown. One of them could be Like their HDMI passthrough does not provide any audio. And there could be multiple reasons behind it, like poor build quality, settings malfunction, bad circuit board, and from your end, it could be your cables or the primary device like the tv or console. A buddy of mine regretted getting an Onkyo because of these issues. Although in the end, we did manage to fix his audio issue.
I’ll be here to help you out as well.
Why the Onkyo HDMI passthrough has no audio?
As I have mentioned above, some of the reasons why there are so many issues, including the HDMI passthrough having no such sound coming, is because of just terrible build quality. The insides of the product don’t have proper wiring or coverage to last a long period of time. The chipsets start to overheat, the wires get stuck.
Apart from that, the reason why there’s no audio after the signal passes through from the HDMI source can be due to your carelessness as well, like not using the correct HDMI cable. As we move forward, we will further talk about more issues and how can identify and solve them.
So, suppose you own one of the Onkyo NR or TX variants or other receivers that are similar in features. In that case, you are at the perfect place.
Tools Required:
- Heat Gun (Better if you get one with a digital display)
- Screwdrivers
- Super Glue
- Aluminum Foil
- Heatsinks
- Thermal Paste
What can you do to make the HDMI of Onkyo receivers have audio?
Let us go through some of the ways I have found to identify why you are not getting any audio, as well as how to fix them. So, keep your gears near you.
1. HDMI Cable
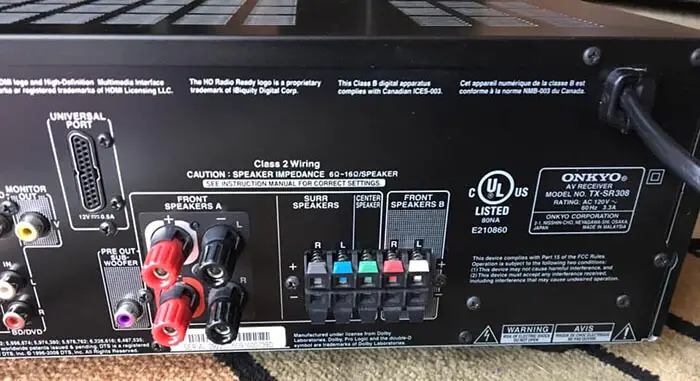
In this scenario, I’ll be talking about two issues related to the HDMI cable. One is an internal issue, and the other is an external issue. So, if you have plugged in your HDMI cable and if you see that there’s no sound coming, then chances are that you have either changed the source settings to video only or the HDMI cable is faulty.
I would recommend you get an HDMI 2.0 cable that will be able to transmit video and audio through one source only. And, if it still doesn’t work, then most like, the cable inside the HDMI controller is faulty.
Troubleshooting Measures:
So, open up the cases of the receiver, and you might see an HDMI cable plugged into the circuit board. It is male to female cable, and the female end is where we plug in our HDMI cable. You might notice that the cable is loosely or tightly attached. Do the opposite of how it is connected, and just for some caution, add some super glue that is not harmful to the material.
2. DTS Chip (Thermal Issue)
This scenario may not just be for your Audio output but also for your video output. It might happen to you that after playing a movie with everything maxed our multi-channel decoding and suddenly you see that your audio has started to stutter, then just goes away, and after that, the receiver just shuts off, then chances are that your Reciever has gotten quite old and it handle that much pressure.
It will most likely die out very soon, and it was already working a bit laggy.
Troubleshooting steps:
So, the solder joints of the receiver’s circuit board probably need to be remelted because, due to old age, they are dried out.
- Take out your heat gun and add heat to the DTS chip and the CPUs, approximately in about 150-170 celsius Fahrenheit. After that, you should be able to turn it on. It should give you a cue if it is fixable or not.
- Then, for a more permanent solution, take out your heat gun and try to heat the speakers over 300 degrees Fahrenheit so that the solder joints get up and running. Based on my research, 375 degrees Fahrenheit is an excellent sweet spot.
- Then try using a blu-ray disc to check if the audio is coming out or not. After that, if you see a test that the thermals are above 80 degrees, then you probably need to install a heatsink on it with a proper coating of thermal paste.
Note: if you don’t have a Heatgun, then you could attempt it with a blow dryer. Make sure you are extra careful and enlightened about the reads and the thermals. It is not recommended.
3. Reset the Onkyo Receiver
It is most likely due to some settings malfunction that you are getting any sort of sound through the passthrough, just video. The default settings have probably changed through an honest mistake while fixing something. So, I believe a factory reset should help you get back to place.
Troubleshooting Steps:
Factory reset methods for Onkyo receivers are,
- Press the VCR and DVR buttons together (The buttons are side by side) and the power button.
- Wait till the digital meter says clear.
- Turn the receiver ON again, and you have successfully reset your receiver.
4. Getting video but not audio
You probably have used two different cables for video and audio. RCA for audio and HDMI for video. Now that you are seeking to play both Audio and Video from an HDMI cable, you are seeing that you are getting only video. Let me show you the fix about after going through the manual.
Solution from the manual:
You can make the HDMI pass-through work for audio as well by going through the settings and turning on the HDMI Control (RIHD). You also need to set the HDMI Through to either auto or by prioritizing that exact HDMI port. Bear in mind that you need to put your source at PCM 2.0 before proceeding.
5. Testing it with another TV
While the issue is more often than not inside the receiver, it can also be through components outside the receiver. Like, such as TiVo Premiere XL cable set-top-box, DISH Networks satellite set-top-box, and DirecTV HD DVR satellite set-top box. Or, it could be that issue isn’t through the audio but through all the audio channel sources.
Troubleshooting measures:
If you are having no or muffled audio from one of your HDMI inputs, please try changing the audio settings on your faulty HDMI source to PCM or other sources. Then turn off the TV, remove the WirelessHD adapters, and turn off the HDMI source. Turn everything back on.
Then if you still see that there’s no audio coming, then you might draw yourself into confusion that the HDMI passthrough has no audio. But, actually, the issue is coming from the other components.
Important: Key things to know before diving into this issue
- If you are interested in taking it to warranty, then don’t open the case and try to reattach things, as that would make the receiver’s warranty void. So, let’s say if you want to change the capacitors, then you’d have to kill the warranty of your receiver. Some of the steps I have mentioned above might make your warranty void. Hence, proceed with caution.
- Being someone who is into opening up and fixing tech, even I struggled will disassembling the receiver. So, unless you’re confident and have full knowledge of what you’re doing, then it is better if you let a professional handle the work.
- While working on the Receiver, when it is opened up, make you don’t touch any other cables or controllers apart from the circuit board where the connection with HDMI is there. You might get electrocuted and harm your internal parts.
- While heating the processors make you have aluminum foil wrapped around the side so that the heat doesn’t damage the circuits and other components.
Frequently Asked Questions
How do I identify the temperature and the number of hours through my Onkyo receiver’s monitor?
If your Reciever has gotten old and is at its limits, then the key identifiers are its average temperature and its total hours. To find out, press the display button and the power button simultaneously. It won’t turn your receiver off. Then press the setup button. You now should be able to see the temp and the hours of your receiver.
What’s the difference between PCM and Passthrough?
In simple terms, Passthrough means basically driving the signal from one device to another device, having no change in the signal, whereas, in PCM, one signal gets converted into another signal. Like, analog to digital.
To Summarize!
Thus, I hope I have gotten you the fix you wanted. I have tried to cover all the things I have practiced myself as well as a few things that I have found while researching. The things which other people have done and found a fix. Suppose you see that you don’t own the mentioned Onkyo receivers above.
In that case, you may still attempt these troubleshooting steps, as the products are most likely to be similar. And, before going through all the steps make sure you have knowledge about all the parts because you could be diagnosing one component thinking it is the other.
Thank you, and I’ll see you soon!
